Use blog widgets and social media plug-ins
You can use all sorts of blog widgets and social media plug-ins with Hatena Blog. Access the "Settings" menu at the top of your blog page, then choose "Design" and click on the Customize tab to get started.
Change the design of your blog
Add blog widgets and plug-ins to individual blog entries
You can enable social media plug-ins such as a Facebook "Like" button, Hatena Bookmark button (B! button), and more by clicking on the "Entry" item found in the "Customize" tab.
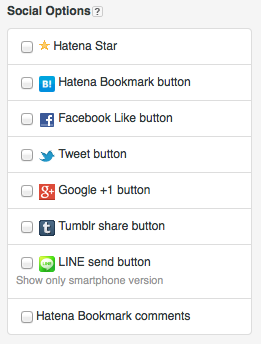
Default social media plug-ins
Some commonly used social media plug-ins have been provided for you to use. By default all of the plug-ins are disabled. Click the checkboxes to enable or disable the plug-ins you want to use.

Choose the buttons that you wish to display and click on the "Update Design" button at the top of the sidebar. The items you have selected will then appear in your blog.
Blog widgets and social media plug-ins will also be shown on the top page of your blog. Use of many different widgets takes some time to process, and they will be displayed as they load when you scroll pages.
Use third party blog widgets and plug-ins
You can also install third party blog widgets and social plug-ins.
Add widgets to display links related to your blog entries, comments posted on other social networks, or install other plug-in types by clicking on the "Customize" tab, then selecting the "Entry" tab, and modifying the "Entry footer" section.
- Copy the HTML code for the blog widget or plug-in from the site that provides it.
- From the design settings page for your blog, choose "Customize" and then click "Entry".
- Paste the HTML code into the "Entry footer" box, and then click on the "Update Design" button.
The blog widgets that you install into the "Entry footer" section will only be displayed on the individual blog entries that you have installed them for. The install process has been designed in this way to prevent large-scale errors that may occur when blog widgets do not function properly.
Variables that can be used in the "Entry footer"
The "Entry Footer" section uses the following variables to send unique URLs and entry titles to social media plug-ins:
| Variable | Description |
|---|---|
| {Title} | Entry title |
| {Permalink} | Entry URL |
| {URLEncodedPermalink} | URL encoded entry URL |
Add blog widgets or plug-ins to the sidebar
You can add blog widgets and plug-ins to the sidebar of your blog as a "HTML Module" .
- Copy the HTML code for the blog widget or plug-in from the site that provides it.
- From the design settings page for your blog, choose "Customize" and then click "Sidebar".
- Click on "+ Add module"
- Select "HTML"
- Paste the HTML code for the blog widget or plug-in in the area where "<p> ... </p>" is displayed.
- Add a title for the module and then click "Apply". The new module will then appear in the sidebar for your blog.
- You can change the order of your modules to position them as you like with your mouse.
- Click on "Update Design" to save your changes.
Please note that with certain design themes, sidebar modules may appear below blog entries instead of in the sidebar.
Add blog widgets or plug-ins to all of your blog entries
If you wish to install blog widgets or plug-ins to all of your blog entries, click on "Customize" to add HTML code to the "Header", "Below the title" or "Footer" sections of your blog.
You can install code in these parts of your blog for purposes such as changing the user cursor type, or to perform modifications that affect all pages of your blog.